


2.3.1 The Site Menu
The Site menu contains the items:
Search: Identified users in Authoring mode can activate the
additional search function Query Objects. For more information on general
search functions, see
page
33.
Site Home: This item brings the user to the default home collection of
the server.
User Home: This item brings the user to his or her personal home
collection.
Server Pool: This item brings you directly to the server pool that your
server is a member of (if a server pool has been set up).
Change Password: Selecting this item causes a dialog box to appear where
you can change your Hyperwave Information Server password.
See below
Preferences: See
page
42.
QUERY
OBJECTS
As well as the search facilities described on
page
33,
identified users in Authoring mode can make use of a
Hyperwave
Information Server function called query objects.
Query objects are queries that are stored on the server in the form of a
collection. Users can activate the query object whenever they choose, and its
results are displayed in the collection. If the query object type is set to
Scheduled and schedule times are set, the query is run periodically and
the results are sent to the specified email address. Another type of query
object is the What's New object. When users manually activate a query
object that has been specified as a What's New object, only objects found or
changed since the last time the query was activated are listed as results.
There is also a query object type named What's New Scheduled which
combines the functionality of the two query object types described above.
CREATING QUERY OBJECTS
- Log in to the server and run a search using either the simple or extended
search form. The results of the search will appear on the search results page
along with a Save Query button (see Figure 17).
- Click on the Save Query button. The Save Query dialog box
(see Figure 19) appears.
- Specify a Title for the query object. Select the appropriate
language from the list. This title will appear in the collection listing.
- Specify a Name for the query object.
- Specify the Name attribute of the collection you want to insert the
query object into.
- Enter an optional description for the query object.
- From the listbox, choose the Query Object Type you wish to execute.
- If you choose Scheduled from the list box, the dialog box
will change to allow you to input evaluation information (see
page
47).
- If you choose What's New from the list box, the dialog box will
change to allow you to input timeout information (see
page
48).
- If you choose What's New Scheduled from the list box, the dialog
box will change to allow you to input both scheduled and timeout information
(see
page
49).
- If you choose Normal, you have already entered all relevant
information.
Click on the OK button.
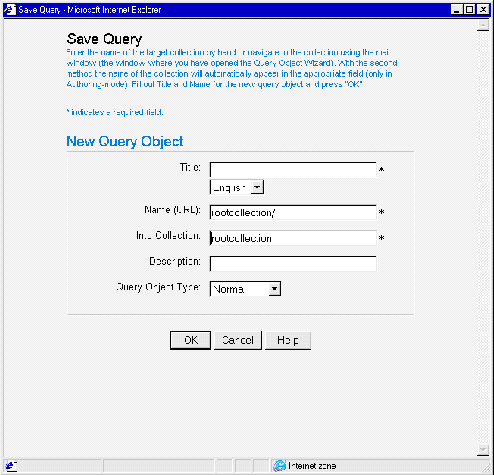 Figure 19: The Save Query dialog box
SCHEDULED QUERY OBJECT
Figure 19: The Save Query dialog box
SCHEDULED QUERY OBJECT
To
specify the evaluation schedule for the query object:
- In the Save Query dialog box, choose Scheduled from the
Query Object Type listbox. The dialog box will change to allow you to input
scheduling information (see Figure 20).
- Use the checkboxes to select the days of the week, or the listbox to
choose the dates in the month on which you want the query to be automatically
executed.
- Specify the interval in minutes you want the query to be run using the
listbox, and specify the times when you want the automatic searches to start
and end.
- Specify up to two email addresses where the results should be sent, as
well as the format you want the results sent in.
- Click on the OK button. The query, as you originally entered it in
the search form, will be saved as a query object.
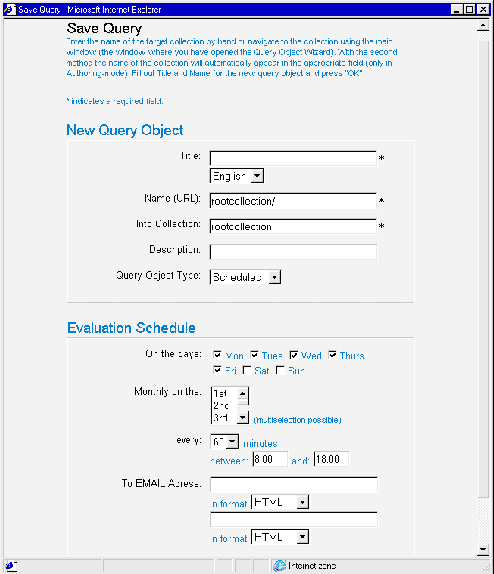 Figure 20: Save Query dialog with Scheduled query object information
WHAT'S NEW QUERY OBJECT
Figure 20: Save Query dialog with Scheduled query object information
WHAT'S NEW QUERY OBJECT
To
configure the What's New query object:
- In the Save Query dialog box, choose What's New from the
Query Object Type listbox. The dialog box will change to allow you to input
timeout information (see Figure 21).
- In the text box labeled Buffer Time enter the number of minutes you
would like the query object to continue displaying the same information.
This information is very important: if you activate the What's New query object
manually by clicking on the collection icon, all the objects found since the
last time you activated the query will be listed. You might navigate to one of
these objects, and click on the link to view the contents. If you then navigate
back to the query object by clicking on its icon, you do not want the
query object to be activated a second time, as this will delete the collection
listing as it was a few minutes previously, and only list objects found since
then. To overcome this, you can specify a specific buffer time within which the
query object will deliver the same result. If you set this to, say, 10 minutes,
you can navigate within the query object collection as much as you like in
those 10 minutes without the collection listing changing.
-
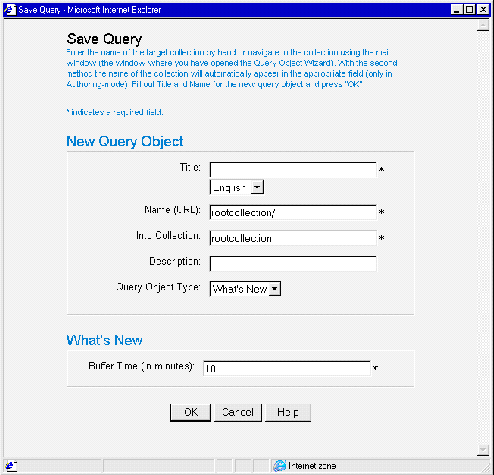
Figure 21: Save Query dialog with What's New query object information
WHAT'S NEW SCHEDULED QUERY OBJECT
Obviously,
the What's New Scheduled query object combines the functionality of the What's
New and the Scheduled query objects. As can be expected, you must set a
schedule for the object and also specify a buffer time.
To configure the What's New Scheduled query object:
- In the Save Query dialog box, choose What's New from the
Query Object Type listbox. The dialog box will change to allow you to input
timeout information (see Figure 21).
- Use the checkboxes to select the days of the week, or the listbox to
choose the dates in the month on which you want the query to be automatically
executed.
- Specify the interval in minutes you want the query to be run using the
listbox, and specify the times when you want the automatic searches to start
and end.
- Specify up to two email addresses where the results should be sent, as
well as the format you want the results sent in.
- In the text box labeled Buffer Time enter the number of minutes you
would like the query object to continue displaying the same information.
This information is very important: if you activate the What's New query object
manually by clicking on the collection icon, all the objects found since the
last time you activated the query will be listed. You might navigate to one of
these objects, and click on the link to view the contents. If you then navigate
back to the query object by clicking on its icon, you do not want the
query object to be activated a second time, as this will delete the collection
listing as it was a few minutes previously, and only list objects found since
then. To overcome this, you can specify a specific buffer time within which the
query object will deliver the same result. If you set this to, say, 10 minutes,
you can navigate within the query object collection as much as you like in
those 10 minutes without the collection listing changing.
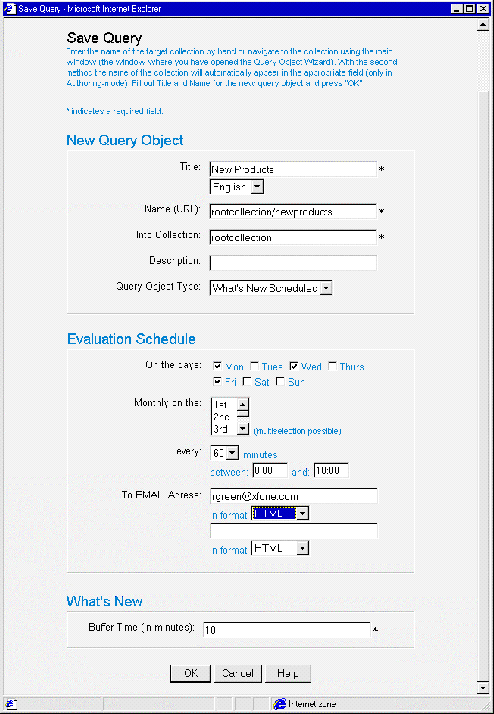 Figure 22: Save Query dialog with What's New Scheduled query object
information
ACTIVATING THE QUERY OBJECT MANUALLY
Figure 22: Save Query dialog with What's New Scheduled query object
information
ACTIVATING THE QUERY OBJECT MANUALLY
When you create a query object, a corresponding item appears in the collection
that you specified when creating the query object. There are four icons to
represent the different types of query object in the collection listing (see
Figure 23). Though the query object may have a schedule by which it is
automatically activated, it is also possible to click on it to activate it at
any time. If you do this, the search results of the query are generated
dynamically and displayed as members of the query object folder. Note that
it is only possible to activate the query by hand when not in authoring
mode. If the query object is of the type What's New or What's New
Scheduled, only the objects found since the last time you activated the
query object will be listed.
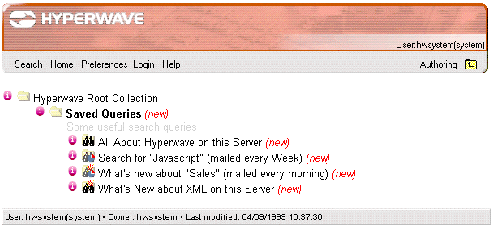 Figure 23: Query Objects
QUERY OBJECT ICONS
Figure 23: Query Objects
QUERY OBJECT ICONS
The following are the icons used to represent the different types of query
object in the collection listing.
 Normal query object
 Scheduled query object
 What's New query object
 What's New Scheduled query object
CHANGING THE QUERY SCHEDULE
It is possible to change the schedule that specifies when the query object
should be automatically executed. To do this, you must access the attributes of
the query object and change the HW_Schedule attribute. This is done as follows:
- Log in to the server by clicking on Login.
- Click on Authoring to switch to authoring mode.
- Navigate to the query object (query objects are shown in collection
listings with a binocular icon as seen in Figure 23) and click on the
 icon next to it.
- Edit the HW_Schedule attribute, which specifies when and how often
the query object is evaluated. See below for syntax.
- Click on the OK button.
The attribute HW_Schedule can
contain several entries. The syntax for a single entry is as follows:
<day>; <starttime>, <stoptime>,
<interval>;
<day> may be mo, tu, we, th, fr, sa or su (for the days of the
week) or a number from 1 to 31 (for the days of the month).
<starttime> and <stoptime> give the beginning and
ending time of evaluation for the selected days. Note that if
<stoptime> is left out, the query is carried out only once for
each specified day at <starttime>. <interval> is the
interval in minutes that the query is executed between <starttime>
and <stoptime>.
EXAMPLE QUERY SCHEDULE
To get a notification mail every Tuesday and Friday every 15 minutes between
8am and 5pm, you would enter tu;08:00,17:00,15;fr;08:00,17:00,15.
Note: For subscriptions
to work, the server has to be configured to be able to run them. If the
subscription feature is not working, contact your server administrator.
CHANGING THE WHAT'S NEW BUFFER TIME
It is also possible to change the buffer time on a What's New or
What's New Scheduled query object. To do this, you must access the
attributes of the query object and change the Buffer_Time attribute. This is
done as follows:
- Log in to the server by clicking on Login.
- Click on Authoring to switch to authoring mode.
- Navigate to the query object (What's New and What's New Scheduled query
objects are shown in collection listings with the icons
 and
and
 )
and click on the
)
and click on the
 icon next to it.
- Edit the Buffer_Time attribute, which specifies the length of time
within which the query object will return the same results.
- Click on the OK button.
All
users with an account on the Hyperwave Information Server can change their
password.
CHANGING YOUR PASSWORD
- Log in to the server by clicking on Login.
- Click on Authoring to switch to authoring mode.
- Select Site->Change Password. The Change Password dialog
box appears. Type in your old password and your new password in the
corresponding text boxes. Type in your new password a second time in the Verify
New Password text box.
- Click on the OK button.
|
|
Benutzer: Gast •
Besitzer: hwsystem • Zuletzt geändert am:
|
|
|