


2.3.5 The Modify Menu
This menu lets you access all functions for modifying objects on the server,
e.g. moving and deleting objects, creating and modifying links, etc. You can
use these functions as long as you have appropriate access rights for the
documents and links you want to modify.
The Modify menu contains the following items:
- Select All: Selects all currently displayed checkboxes.
- Deselect All: Deselects all currently displayed checkboxes.
- Attributes: Lets you view and edit the attributes of the selected
object or objects.
- Edit Text: Plain text and HTML documents can be edited.
- Edit HTML: Edit HTML using the Hyperwave HTML Editor (Microsoft
Internet Explorer only)
- Hyperlink: Lets you add, modify or delete hyperlinks in HTML text.
- Move: Allows you to move documents and collections from one
collection to another.
- Create Shortcut: Lets you create a shortcut from a collection to a
collection or document.
- Duplicate: Makes duplicate (real copy and not a shortcut) of a
document.
- Delete: Deletes documents and collections.
- Replace: Lets you replace an existing document.
- Version Control: Version control allows you to save and manage all
versions of a document ever created.
- Configurations: Allows you to "version control" entire collection
hierarchies, by saving their structural information as well as their content
and meta-information.
- Release Flow: Allows you to set up a chain of users for the
systematic review of documents.
- Lock/Unlock Object: Lets you lock/unlock documents.
These menu
items are explained in greater detail below.
DOCUMENT CLASSES: CHANGES TO THE MODIFY MENU
As in the case of the Publish menu, certain functions that are available for
declared document classes will appear in the Modify menu, and items that
are not valid for the document class will be disabled. Changes to the Modify
menu are explained on
page
117.
The
Modify Attributes function allows users with appropriate access permissions to
modify the attributes of one or more documents or collections. The function can
be used recursively in the case of collections. These editable attributes
include, among others, Title, Name and Rights. Other
attributes, such as TimeCreated, DocumentType and GOid
are maintained by the server and cannot be changed. Remember that you can only
modify the attributes of version controlled documents if you check them out
first.
OVERVIEW OF THE MODIFY ATTRIBUTES FUNCTION
The Modify Attributes function behaves differently under different
circumstances. There exist the following three cases:
- When a single document is selected, the Modify Attributes dialog
box appears (see Figure 35). This dialog box allows the user to modify the
attributes of that document only (see page 69).
- When a single collection is selected, a slightly different version
of the Modify Attributes dialog box appears. This dialog box has an
Advanced button (see Figure 36). Users can use this dialog box to modify
the attributes of the collection only, or they can click on the Advanced
button to display the Modify Objects dialog box. This dialog box allows users
to change the attributes of the collection and its children (optionally
recursively) all at once (see page 70).
- When more than one document or collection is selected, the Modify
Objects dialog box appears. This dialog box allows the user to modify the
attributes of all the selected documents, collections and children of
collections (optionally recursively) all at once (see page 71).
MODIFYING
THE ATTRIBUTES OF A SINGLE DOCUMENT
Attributes of a single document or collection are edited as follows:
- Log in to the server by clicking on Login.
- Click on Authoring to switch to authoring mode.
- Navigate to the document or collection whose attributes you want to modify.
- Select Modify->Attributes. The list of the object's attributes
appears (see Figure 35). The Attributes Type, Document Type,
Owner, TimeCreated, Subdocs, and GOid are
maintained by the server and cannot be edited.
- Click on the More button at the bottom of the attribute list to add
a new attribute using the menu and field at the bottom of the list. Under
Custom Attribute you can enter a completely new attribute with the desired name
and give it an arbitrary value.
- To edit the Rights attributes simply, click on the Open Rights
Wizard button. The Rights Wizard is described on
page
25.
- When you are finished editing the attributes, click on the OK
button.
Note: Certain attributes, such as Title and
Name, can be entered multiple times. You can have, e.g. several different Name
attributes and thus have several different URLs which you can use to access the
same object.
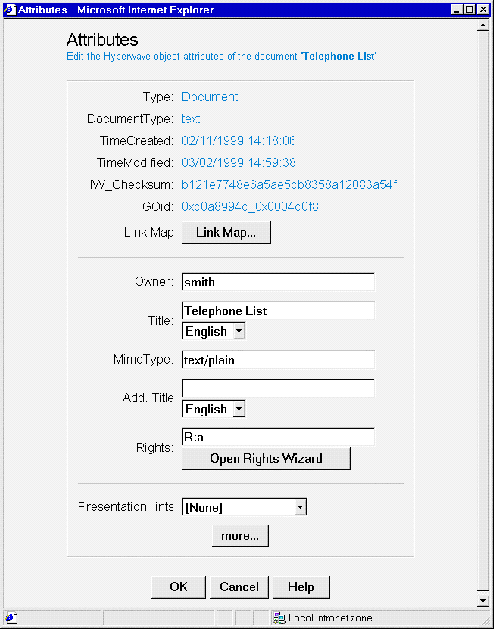 Figure 35: Modifying attributes of a single object
MODIFYING THE ATTRIBUTES OF A COLLECTION
Figure 35: Modifying attributes of a single object
MODIFYING THE ATTRIBUTES OF A COLLECTION
Attributes of collections are modified in the same manner as those of single
documents (see Modifying the Attributes of a Single Document). However, when
modifying the attributes of a collection, you have the option of clicking on
the Advanced button (see Figure 36). This gives you access to the Modify
Objects function (see
page
71).
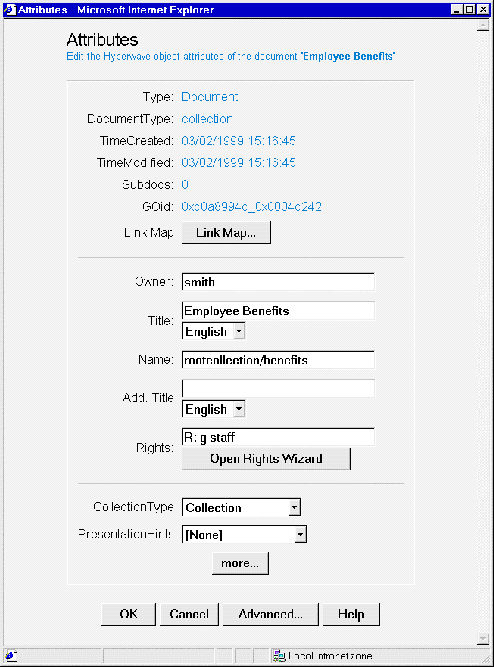 Figure 36: Modifying attributes of a single collection
MODIFYING THE ATTRIBUTES OF MULTIPLE OBJECTS
Figure 36: Modifying attributes of a single collection
MODIFYING THE ATTRIBUTES OF MULTIPLE OBJECTS
Attributes
of multiple documents or collections are edited as follows:
- Log in to the server by clicking on Login.
- Click on Authoring to switch to authoring mode.
- Navigate to the document(s) or collection(s) whose attributes you want to
modify and activate their checkboxes.
- Select Modify->Attributes. The Modify Objects dialog box appears
(see Figure 37).
- Make a list of the attributes you want to add, remove and change (the
procedures for adding, removing and changing attributes are explained below).
- If you want to use the function recursively, make sure the Change
attributes recursively checkbox is checked.
- Apply the changes by clicking on the OK button.
 Figure 37: The Modify Objects dialog box
After clicking the OK button, the dialog box will read Results Modify
Objects, and the text box will display progress of the modification of the
attributes. This dialog box gives you information about which objects are being
modified, and any errors experienced are also logged (see Figure 38).
Figure 37: The Modify Objects dialog box
After clicking the OK button, the dialog box will read Results Modify
Objects, and the text box will display progress of the modification of the
attributes. This dialog box gives you information about which objects are being
modified, and any errors experienced are also logged (see Figure 38).
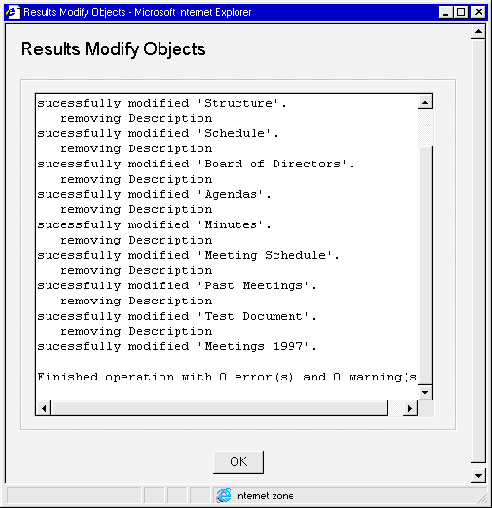 Figure 38: Results Modify Objects dialog box
You can use the following three functions when modifying attributes:
Figure 38: Results Modify Objects dialog box
You can use the following three functions when modifying attributes:
- add attribute: adds a new attribute-value pair
- remove attribute: deletes an attribute
- change attribute: changes the value of an existing attribute
How to
use these functions is explained below.
ADDING AN ATTRIBUTE
- Click on the Add button in the Modify Objects dialog box.
The Add Attribute dialog box appears.
- Select an attribute type from the listbox or enter an attribute type
manually in the Name textbox.
- Enter a value for the attribute in the Value textbox. If you are
entering a Rights attribute, you can use the Rights Wizard to enter the value
by clicking on the Open Rights Wizard button.
- Click the OK button. The attribute you want to add will appear in
the large text box in the Modify Objects dialog box.
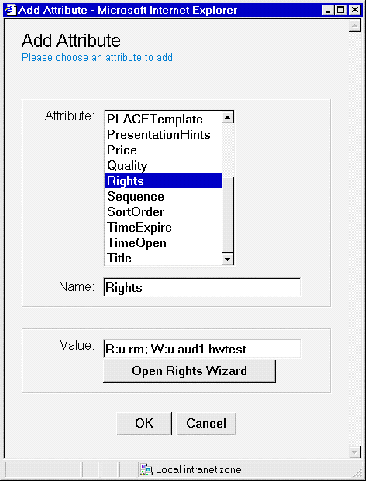 Figure 39: Add Attribute dialog box
REMOVING AN ATTRIBUTE
Figure 39: Add Attribute dialog box
REMOVING AN ATTRIBUTE
- Click on the Remove button in the Modify Objects dialog box.
The Remove Attribute dialog box appears.
- Select an attribute type from the listbox or enter an attribute type
manually in the Name textbox.
- To remove a specific instance of the attribute, enter the value of
that instance in the Value textbox. You may use a wildcard (*) in the
value. If you are entering a Rights attribute, you can use the Rights Wizard to
enter the value by clicking on the Open Rights Wizard button. To
remove all instances of the attribute, leave the Value textbox empty.
- Click the OK button. The attribute you want to delete will appear
in the large text box in the Modify Objects dialog box.
 Figure 40: Remove Attribute dialog box
CHANGING AN ATTRIBUTE
Figure 40: Remove Attribute dialog box
CHANGING AN ATTRIBUTE
- Click on the Change button in the Modify Objects dialog box.
The Change Attribute dialog box appears.
- Select an attribute type from the listbox or enter an attribute type
manually in the Name textbox.
- Enter the current value of the attribute in the Old Value textbox.
You may use a wildcard (*) in this value. If you are entering a Rights
attribute, you can use the Rights Wizard to enter the value by clicking on the
Open Rights Wizard button.
- Enter the value you want to give to the attribute in the New Value
textbox. If you are entering a Rights attribute, you can use the Rights
Wizard to enter the value by clicking on the Open Rights Wizard button.
- Click the OK button. The attribute you want to change will appear
in the large text box in the Modify Objects dialog box.
 Figure 41: Change Attribute dialog box
LINK MAP
Figure 41: Change Attribute dialog box
LINK MAP
When editing attributes, it is possible to view the references to and from a
document by clicking on the Link Map button in the attributes dialog
box. This allows you to see the incoming and outgoing links for an object, as
well as its parent collection(s) and children documents.
The
Edit Text function lets you edit plain text documents and HTML source
code. This is done as follows:
- Log in to the server by clicking on Login.
- Click on Authoring to switch to authoring mode.
- Navigate to the text you want to edit. Select Modify->Edit Text.
The Edit Text dialog box appears (see Figure 42). You can now carry out
any modifications on the text.
- Click on the OK button.
Note: If you edit a
plain text document, any links present in the document will be deleted when you
upload the modified document.
LINK IDS IN HTML DOCUMENTS
You may wonder about the numbers that appear after links in the source text of
HTML documents (see Figure 42). They are unique link identifiers, which ensure
that your links remain consistent even if you move the destination document to
another collection. When they appear it means that the link is closed, i.e. the
link destination exists in your system. If you want to change a link to point
to another object you need to remove its link ID; otherwise the link will
continue pointing to the previous destination.
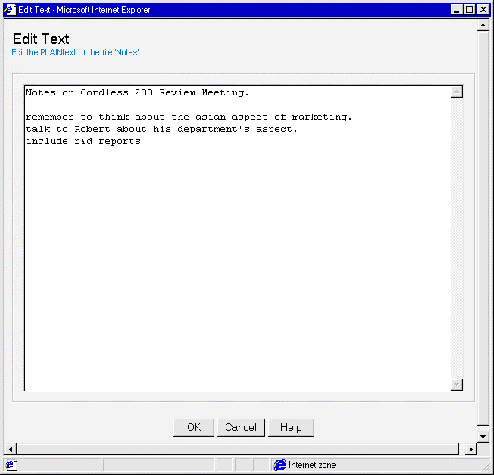 Figure 42: Editing Plain Text
The
Edit HTML function lets you edit HTML documents using the Hyperwave HTML
Editor This function will only be enabled if you are working with Microsoft
Internet Explorer 4.x. This is done as follows:
Figure 42: Editing Plain Text
The
Edit HTML function lets you edit HTML documents using the Hyperwave HTML
Editor This function will only be enabled if you are working with Microsoft
Internet Explorer 4.x. This is done as follows:
- Log in to the server by clicking on Login.
- Click on Authoring to switch to authoring mode.
- Navigate to the text you want to edit. Select Modify->Edit HTML.
The Hyperwave HTML Editor appears (see Figure 43). You can now carry out any
modifications on the text.
- Click on the Post to Server button (
 )
to save the modified document.
)
to save the modified document.
 Figure 43: Editing HTML with the Hyperwave HTML Editor
Note: The Hyperwave HTML Editor only works on Microsoft
Internet Explorer 4.x. If you are working with Netscape Navigator, or an
earlier version of the Internet Explorer, HTML text can only be edited via the
Edit Text dialog box (with HTML tags).
The
Modify menu allows you to create, edit or delete hyperlinks in HTML
texts.
Figure 43: Editing HTML with the Hyperwave HTML Editor
Note: The Hyperwave HTML Editor only works on Microsoft
Internet Explorer 4.x. If you are working with Netscape Navigator, or an
earlier version of the Internet Explorer, HTML text can only be edited via the
Edit Text dialog box (with HTML tags).
The
Modify menu allows you to create, edit or delete hyperlinks in HTML
texts.
Links can be created on Hyperwave Information Server using the Link Wizard
(note that you must have JavaScript 1.2 or higher to use the Wizard). It is
possible to create links in HTML and plain text. Please note that at this time,
links created in plain text documents are deleted if the text is edited.
- Log in to the server by clicking on Login.
- Click on Authoring to switch to authoring mode.
- Select Modify->Hyperlink->Add Hyperlink. The Link Wizard
appears.
- Set the link start. This is done by navigating to the document where you
want the link start, selecting the desired word or phrase with the mouse and
clicking on the Current Selection or Whole Document button near
the top of the dialog box. The marked phrase and the title of the document
appear in the respective fields.
- Use the option buttons to decide what to do if the selected phrase appears
more than once in the text.
- Select the link type. You can create a normal reference link, an
annotation, or an inline image. Add optional access rights for the link using
the Rights Wizard (see
page
25).
- Navigate to the document where you want the link target, or select it by
clicking on the checkbox to the left of the document title. To set the entire
document as target, click on the Whole Document button. To set a phrase
as target, select the phrase and click on the Current Selection button.
- Click on the OK button.
Note: If your local
server is part of a server pool,
it is possible to make links from the local server to another server in the
pool. The only difference is that when setting the link target you have to
navigate to the remote server over the "Hyperwave Serverpool" collection, which
is found in the root collection.
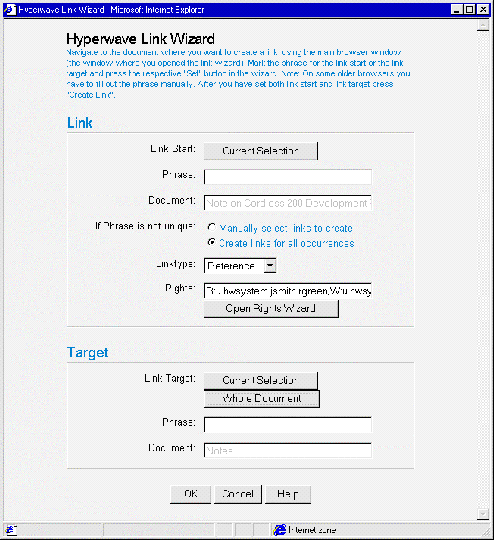 Figure 44: The Link Wizard
LINK ATTRIBUTES
Figure 44: The Link Wizard
LINK ATTRIBUTES
The Link Wizard can be used to give various attributes
to the links created if desired. These attributes include Title, Rights, and
Linktype (reference, annotation or inline).
Giving a link a Title can help you find the link during a search. Rights are
used to control which users can see the link. For example, you can give a
document and a link in the document different rights so that the users who can
read the document do not necessarily see the link.
There are three different link types: Reference, Annotation and
Inline image. Reference links
are normal links. Annotation links
are links from an annotation to the annotated document (see
page
58). Inline image links
are links from an HTML text to an image, which cause the image to appear in the
text.
MODIFYING HYPERLINKS
- Log in to the server by clicking on Login.
- Click on Authoring to switch to authoring mode.
- Navigate to the document whose hyperlinks you want to edit. Select
Modify->Hyperlink->Modify Hyperlink. The Modify Hyperlinks dialog
box appears, displaying the document with an attributes icon (
 )
next to each link (see Figure 45). Click on one of these icons to access the
attributes of the link. A list of the link's attributes appears.
)
next to each link (see Figure 45). Click on one of these icons to access the
attributes of the link. A list of the link's attributes appears.
- It is possible to change the Owner attribute of the link (if you are a
member of the group system) or to change or add a Title or Rights attribute.
Click on the More button to add an additional attribute (see
page
116 for a list of attribute types with explanations) or a custom attribute
(attribute with an arbitrary name and value).
- Click on the OK button.
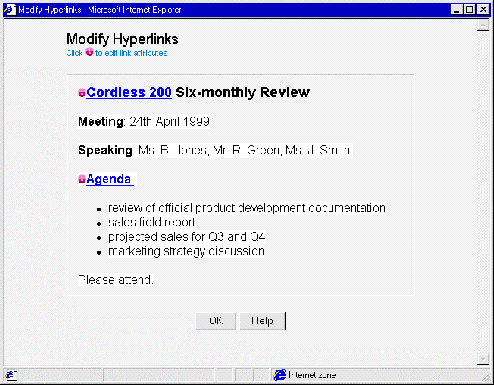 Figure 45: Modify Hyperlinks
DELETING LINKS
Figure 45: Modify Hyperlinks
DELETING LINKS
- Log in to the server by clicking on Login.
- Click on Authoring to switch to authoring mode.
- Navigate to the text whose links you want to delete and select
Modify->Hyperlinks->Delete Hyperlink. The Delete Hyperlinks
dialog box appears, see Figure 46.
- Use the checkboxes to select the links you want to delete, or click on the
check all button to select all the links in the document.
- Click on the OK button.
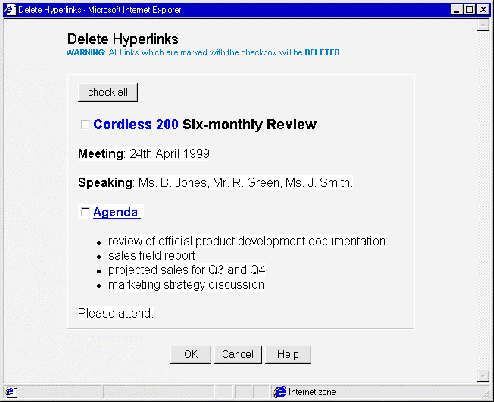 Figure 46: Delete Links dialog box
MOVING
OBJECTS
Figure 46: Delete Links dialog box
MOVING
OBJECTS
Objects are moved
as follows:
- Log in to the server by clicking on Login.
- Click on Authoring to switch to authoring mode. The items in the
collection hierarchy appear with a checkbox next to each.
- Navigate to the collection that contains the items you want to move. Use
the checkboxes to select one or more items.
- Select Modify->Move. In the dialog box that appears, either
enter the name of the target collection for the object(s) to be moved in the
Destination textbox or browse to the collection.
- Click on the OK button.
A
shortcut is a link to a Hyperwave Information Server object. If you make a
shortcut
to an object, it appears as if this object is contained in the collection.
However, only one physical copy of it exists on the server. If you want to make
a real copy of an object on the server, use the duplicate function.
CREATING SHORTCUTS TO OBJECTS
- Log in to the server by clicking on Login.
- Click on Authoring to switch to authoring mode. The items in the
collection hierarchy appear with a checkbox next to each.
- Navigate to the collection that contains the items you want to make
shortcuts to. Use the checkboxes to select one or more items.
- Select Modify->Create Shortcut. In the dialog box that appears,
select the target collection for the object(s) to be linked.
- Click on the OK button.
Note: If your local
server is part of a server pool,
it is possible to link documents from another server in the pool to a
collection on your server. The only difference is that in step one you have to
navigate to the remote server over the "Hyperwave Serverpool" collection, which
is found in the root collection.
The
duplicate function makes an actual physical copy of a document on the
server.
DUPLICATING OBJECTS
Documents are duplicated
as follows:
- Log in to the server by clicking on Login.
- Click on Authoring to switch to authoring mode. The items in the
collection hierarchy appear with a checkbox next to each.
- Navigate to the collection that contains the items you want to duplicate.
Use the checkboxes to select one or more items. Note that it is not possible to
copy collections.
- Select Modify->Duplicate. In the dialog box that appears, select
the target collection for the duplicated object(s).
- Click on the OK button.
Objects
are deleted as follows:
DELETING OBJECTS
- Log in to the server by clicking on Login.
- Click on Authoring to switch to authoring mode. The items in the
collection hierarchy appear with a checkbox next to each.
- Navigate to the collection that contains the object(s) you want to delete
and use the checkboxes to select one or more documents to be deleted.
- Select Modify->Delete and click on OK in the dialog box
that appears. The objects will be permanently
deleted.
Note: The delete function is recursive, i.e. you
can delete a collection even if it contains other documents and collections.
REPLACING
DOCUMENTS
- Log in to the server by clicking on Login.
- Click on Authoring to switch to authoring mode.
- Navigate to the document you want to replace and select
Modify->Replace. The Replace dialog box appears, displaying a
list of the attributes of the current document. There are text boxes where you
can enter a base attribute and a file name.
- Enter a base if you are replacing a text (the value of this attribute is
used as a base for the links in the document if it is an HTML document).
- Enter a file name including the path, or select a file using the file
browser.
- Click on the OK button.
INTRODUCTION
Release
Flow is an extremely useful and efficient document-staging feature for the
systematic review of documents. Using Release Flow, a procedure can be set up
and used to circulate, review, edit and release documents to a predefined chain
of users.
A Release Procedure is created to define the chain of events the documents will
follow before being published. Once a Release Procedure has been created, many
instances of a Procedure, called Cases, can be started. Each Procedure is
assigned an Administrator, a Publisher, Auditors and
optionally, Readers.
The Administrator has the rights to edit and delete Procedures. This
user must be a member of the user group system.
The Publisher creates documents to be published, and assigns these
documents to a Case. Once the Case is created, the Publisher releases it to the
Auditors. The Cases are stored in a Case collection. The documents are
published upon successful completion of the Case, or sent back to the Publisher
for rework if the Case is rejected.
The Auditors are responsible for reviewing documents. An Auditor
who accesses a Case has the choice of either releasing or rejecting the Case
after reviewing its documents. If the Case is released, it is passed on to the
next Auditor in the list. If the Case is rejected, it is returned to the
Publisher for rework. Auditors add comments to the Case, explaining
their reasons for releasing or rejecting it.
Readers are assigned read rights to documents in the Release collection,
once documents have been released. Readers do not actively take part in the
reviewing process.
EXAMPLE
Let us take an example. A financial analyst writes a report on his company's
projected sales figures for the quarter. Before this document is made available
to all the employees in the company, it must first be reviewed by the
controller, the sales manager and the general manager. The financial analyst is
therefore the Publisher and the other three participants are
Auditors. The Procedure Administrator creates a new Procedure and enters
a list of user names as Auditors. The order in which the names are
entered in this example are: Controller > SalesManager > GeneralManager .
This is exactly the order in which documents are circulated for review.
REVIEWING DOCUMENTS
Auditors receive notification that a Case is to be reviewed. When an Auditor
navigates to the Case collection, the Case is displayed with a comment box and
two option buttons underneath it, Release and Reject. The Auditor
either releases the Case, sending it on to the next Auditor or back to the
Publisher if this Auditor is the last on the list, or rejects the Case, sending
it back to the Publisher for editing. The Auditor can also add a comment on the
reasons for releasing or rejecting the Case. These comments are stored in the
Case collection, along with the documents.
If a Case is rejected, the documents and their comments are inserted into a
subcollection of the Case collection. This collection is labeled Rejection and
includes the relevant date and time.
The Case is started again when the Publisher has finished revising the returned
documents. Documents that are released for the second time must be sent through
all Auditors again, not just to the Auditor who rejected the Case.
RELEASE FLOW MENU
The Release Flow menu can be found under the Modify menu. The menu items under
Release Flow are as follows: New Release Procedure, Edit Release Procedures,
Assign Release Procedure, Show open Cases, Create Cases, Start Case, Delete
Case and Show state of the Case. These items are explained in detail below.
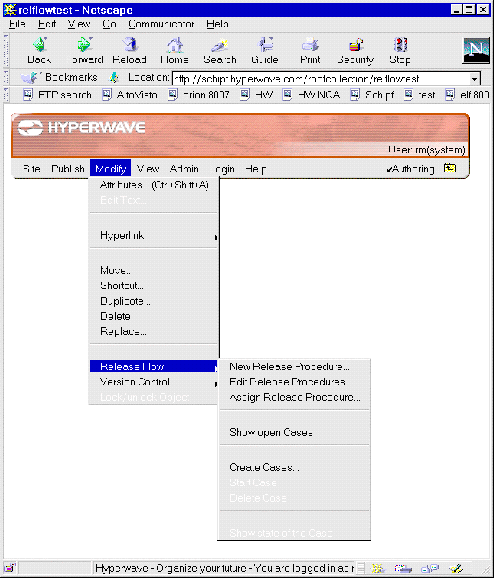 Figure 47: Release Flow Menu
CREATING A NEW PROCEDURE
Figure 47: Release Flow Menu
CREATING A NEW PROCEDURE
New Procedures can be created by system users and by users who have had the
special attribute ReleaseAdmin (value="yes") inserted into their user
information. For more information on setting this attribute and configuring
Hyperwave Information Server for Release Flow, see the Hyperwave
Administrator's Guide, or contact your System Administrator.
When
creating a new Release Procedure, the Administrator must enter the following
information:
Procedure Name: the name the Procedure is to have. This should be
descriptive.
Description: a short description of the Procedure, which will appear on
the interface next to the collection listing,
Administrators: the user(s) with the rights to edit the Procedure,
Publishers: the user(s) that assigns documents to Procedures and starts
Cases,
Auditors: the user(s) who are to review the documents of a Case. These
user names must be separated by a ">" sign, and entered in the order in
which they are to receive documents.
Note: For all Cases where there is a user name or list of user
names to be entered, there is a button that will open the User Wizard, allowing
the Administrator to choose user names easily from a list.
Notification: There are two checkboxes, allowing the user to decide
which notification options are to be used. If the option Show open cases at
login is selected, a pop-up window will appear when the Publisher or
Auditor logs into the Hyperwave Information Server. If the option Inform per
e-mail is selected, the Publisher or Auditor will receive an e-mail
detailing the status of Cases in which they are involved. For more information
on notification, see
page
93.
Readers: the user(s) that have read rights to documents in the Release
collection that have already been reviewed and released. These users can access
documents when they are released but have no active part in the review
procedure. If no users are specified as Readers at this point, read
rights for the Release collection will be given to all users.
Release collection: The next two check boxes allow the Administrator to
manage the Release collection into which Release Flow documents are inserted:
By clicking Published documents are copied to the "release collection",
the Administrator ensures that a working copy of all Release Flow documents is
stored in the Release collection. The advantage of choosing this option is that
working copies of documents to be reviewed are created in a separate Release
collection, and the initial versions of the documents still exist in their
original collection.
By clicking Published documents can only be stored in the "release
collection", the Administrator ensures that the value inserted for
Release collection (see below) cannot be changed. All Release Flow
documents must then be stored in this collection, and the value cannot be
edited at other stages (e.g. in the Assign Documents to Release Procedure
dialog box, Figure 49).
The name of the collection is entered, where documents assigned to Release Flow
can be stored. It is also possible to edit and release documents from their
original location.
Detailed description: a detailed description of the Procedure, which is
listed in the text file version of the Procedure description. This is an
administrative document, which shows attributes and values associated with the
Procedure.
- The following steps explain how to create a new Release Procedure:
- Log onto the server by clicking on Login. Remember that new
Procedures can only be created by system users and by users who have had the
special attribute ReleaseAdmin (value="yes") inserted into their user
information
- Click on Authoring to switch to authoring mode.
- Select Modify ->Release Flow->New Release Procedure.
- In the dialog box that appears, input the appropriate information as
discussed above
- Click on the OK button.
 Figure 48: New Release Procedure dialog box
EDITING A RELEASE PROCEDURE
Figure 48: New Release Procedure dialog box
EDITING A RELEASE PROCEDURE
- The following steps explain how to edit a Release Procedure. In
order to edit a Procedure, the user must have been assigned as Administrator
when the Procedure was first created.
- Log onto the server by clicking on Login.
- Click on Authoring to switch to authoring mode.
- Select Modify ->Release Flow->Edit Release Procedure...
- A dialog box will appear with a list of all Release Procedures. Click on
the edit button beside the Procedure you wish to modify.
- In the dialog box that appears, modify the appropriate information.
- Click on the OK button.
ASSIGNING
DOCUMENTS TO A RELEASE PROCEDURE
-
assigndoctoprocOnce
Release Procedures have been set up, instances of these Procedures (Cases) can
be created and one or more documents can be assigned.
- The following steps explain how to assign a document to a Release Procedure.
- Log on to the server by clicking on Login.
- Click on Authoring to switch to authoring mode.
- Navigate to the collection containing the documents you wish to assign.
- Select the document(s) you wish to assign to a Release Procedure using the
checkboxes.
- Select Modify ->Release Flow->Assign Release Procedure ...
- A dialog box appears listing all currently existing Release Procedures.
Choose the Procedure you wish to assign the documents to, using the option
buttons.
- The default Release collection for these documents appears in a text box.
You can edit this collection name as long as the option Published documents
can only be stored in the "Release collection" was not checked in the New
Release Procedure dialog box (see Figure 48). It is at this point that copies
of the documents are copied into the Release collection (if this was chosen
when Creating a New Procedure).
- If you wish to release the documents to the reviewers immediately, check
the option Start Case immediately, and input a Case title.
Checking this option skips the step Create Case.
-
If
this option is not checked, the next step is to create the Case. See
#createcasepage 91.
- Click on the OK button.
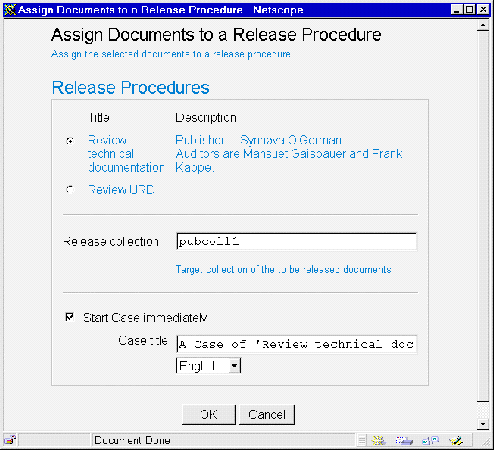 Figure 49: Assign Documents to Release Procedure dialog
box
ASSIGNING DOCUMENTS CONTAINING INLINE IMAGES
Figure 49: Assign Documents to Release Procedure dialog
box
ASSIGNING DOCUMENTS CONTAINING INLINE IMAGES
When
documents being assigned to a Release Procedure contain inline images, and
these images are not located in the same collection as the documents to which
they belong, an extra dialog box is displayed. This dialog box lists all inline
images in the selected document(s) and allows the Publisher to select which
ones are to be included in the Release Procedure for review. These images then
appear as separate documents in the Release collection.
It is also possible to assign these documents to separate flows, e.g. if the
text document is to be reviewed by the manager and the documentation specialist
and the graphics are to be reviewed by the manager and the graphic artist.
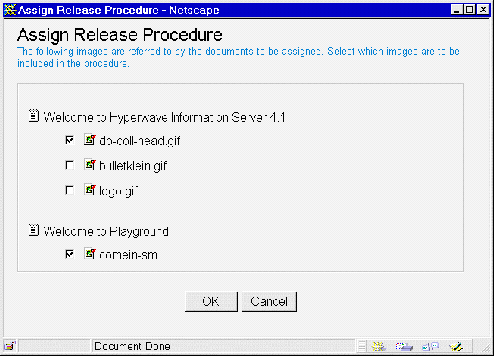 Figure 50: Selecting Inline Images
CREATING CASES
Figure 50: Selecting Inline Images
CREATING CASES
Once
documents have been assigned to a Procedure, the Publisher can create the Case.
This means that the Publisher selects documents and creates instances of
Release Procedures for those documents. The Publisher also assigns a Case
title and either starts the Case straight away or prepares it for a later
start. If the documents selected are assigned to more than one Release
Procedure, all relevant Cases will appear in the Create Case dialog
box.
The Cases are stored in folders in the Release collection. These folders (Case
collections) take their names from the Case titles.
The Create Case dialog box appears (see Figure 51), allowing titles, and
a language ID be attributed to each Case. Current language options are English
and German. In this dialog box, there is also a Start Case immediately
checkbox for each Case, allowing the Publisher to start the Case from
within this dialog.
The first time a document is released to a Procedure, it is likely that the
steps Create Case and Start Case will happen concurrently.
However, as the review process continues, and documents are returned to the
Publisher for editing and reworking, the Publisher will create Cases in order
to work on documents. Only when he has made the appropriate changes to the
documents, will the Case then be started again (released to the Procedure).
If the checkbox Start Case immediately was selected in the previous step
(Assigning Documents to a Release Procedure), then the Create
Case step is carried out automatically.
The following steps explain how to create a Case:
- Log on to the server by clicking on Login.
- Click on Authoring to switch to authoring mode.
- Navigate to the collection containing the documents you wish to create a
Case for.
- Using the checkboxes, select the document(s) you wish to create a Case for.
- Select Modify ->Release Flow->Create Case...
- In the dialog box that appears, for each Case, type in a Case Title
and select a language attribute from the listbox. It is also possible to start
the Case from within this dialog box by selecting the checkbox labeled Start
Case immediately. This option is selected by default.
- Click on the OK button.
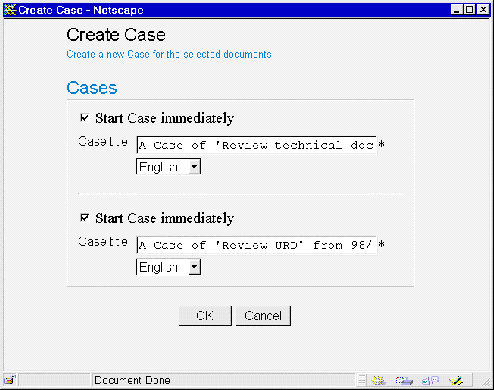 Figure 51: Create Case dialog box
STARTING CASES
Figure 51: Create Case dialog box
STARTING CASES
As previously mentioned, it is also possible to start Cases from within the
Create Case dialog box. When starting a Case from within the Create
Case dialog box, it is also required to input a Case Title and a
language attribute (current options: English and German).
The following steps explain how to start a Case using the Start Case
option in the Release Flow menu. To start a Case or Cases from within
the Assign Documents to a Release Procedure dialog box, or from within
the Create Case dialog box, see
page
89 and
page
91.
- Log on to the server by clicking on Login.
- Click on Authoring to switch to authoring mode.
- Navigate to the collection containing the Case(s) you wish to start.
- Select the Case(s) you wish to start using the checkboxes.
- Select Modify ->Release Flow->Start Case...
- Click on the OK button.
NOTIFICATION
When
creating a new Release Procedure, there are two options to select for
notification of Cases to be reviewed etc (see Figure 48). Notification can
occur either by e-mail, by means of a pop-up window at login, or both. Both
methods of notification contain a link to the Case in question.
The Auditor who rejects a Case will receive notification that the Publisher has
been informed of the rejection, and the last Auditor in a Procedure will
receive notification that the Publisher has been informed of the successful
completion of the Case.
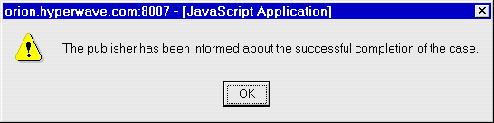 Figure 52: Notification Pop-up
It is also possible at any time for Auditors and Publishers to check Cases to
be created, Cases to be started, and Cases closed since last login by choosing
the option Show Open Cases from the Release Flow menu. See
Viewing Open Cases, below.
Figure 52: Notification Pop-up
It is also possible at any time for Auditors and Publishers to check Cases to
be created, Cases to be started, and Cases closed since last login by choosing
the option Show Open Cases from the Release Flow menu. See
Viewing Open Cases, below.
VIEWING OPEN CASES
- The following steps explain how to view all open Cases.
- Log onto the server by clicking on Login.
- Click on Authoring to switch to authoring mode.
- Select Modify ->Release Flow ->Show Open Cases...
- A window will appear displaying all open Cases. The Cases are grouped
under the headings Cases to be started, Cases to be reviewed, and
Closed Cases since last login. The Cases appear as links, which will
bring the user directly to the appropriate Case collection.
- Click on the OK button.
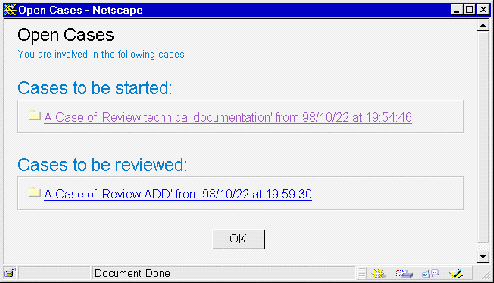 Figure 53: Show Open Cases dialog box
VIEWING THE STATUS OF A CASE
Figure 53: Show Open Cases dialog box
VIEWING THE STATUS OF A CASE
- The status of a Case is viewed as follows:
- Log onto the server by clicking on Login.
- Click on Authoring to switch to authoring mode.
- Navigate to the Case collection whose status you wish to view.
- Select Modify ->Release Flow->Show State of Case...
- A window will appear displaying the status of the selected Case. Possible
values for the release flow status are: not yet started, waiting for
the review to begin, being reviewed, being edited,
released. The window also displays the date of the last review or
release, the last Auditor to have released the Case, the Case Publisher and the
number of documents in the Case.
- Click on the OK button.
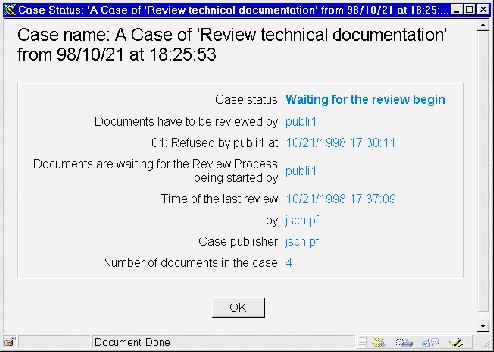 Figure 54: Show State of Case dialog box
DELETING A CASE
Figure 54: Show State of Case dialog box
DELETING A CASE
- Cases
are deleted as follows:
- Log on to the server by clicking on Login.
- Click on Authoring to switch to authoring mode.
- Navigate to the collection containing the Case you wish to delete.
- Select the Case(s) you wish to delete using the checkboxes.
- Select Modify ->Release Flow->Delete Case...
- Click on the OK button.
Note: By deleting a
Case, you remove it completely from the Procedure to which it was assigned. All
duplicates of documents stored in the Release collection will be deleted. The
original version of documents is not affected by this action, nor is the
Procedure to which documents had been assigned.
Hyperwave
Information Server's Version Control feature lets you save and retrieve all the
versions ever created of a document on the server. The items on the Version
Control are: Check In, Check Out, Set Committed Version,
Revert to Version, Take out (Version), Delete, Create
Shortcut, Version History and Checked out Documents.
CHECK IN AND CHECK OUT
Documents on Hyperwave Information Server are not automatically version
controlled. If you want a document to be version controlled, you must use the
Check in
function on it. This assigns a version number to the document (starting with
1.0), and makes it so that no one can edit it unless he or she has used the
Check out
function on it. When a user checks out the document, it is automatically locked
for this user, meaning that only this user can edit it until it is checked in
again. You can select the checkbox labeled Check in only if content
changed, in which case, a new version will only be created and the version
number increased, if there have been any changes made to the document.
Starting with version 5.1 of the HWIS, it is possible to check out a version
other than the most recent version. You will be prompted with a dialog box that
allows you to choose which version to check out. If you do not wish this dialog
box to appear, but would prefer to check out documents in the usual manner, you
can select the checkbox in Preferences (Site menu) labeled
Always check out last version.
EXPERIMENTAL AND LAST COMMITTED VERSION
When a document has been checked out by a user, it is called an experimental
version. After the document has been checked in, the new version is called the
last committed version.
SET COMMITTED VERSION
With the Set Committed Version
function, you can commit a version other than the most recent version. This
version will then be displayed in the collection listing for all other users
with read rights to access, and users with write rights can continue working on
further versions of the document.
REVERT TO VERSION
With the Revert to Version
function you can go back to any version in the history of a document and use it
as the most recent version (last committed version).
TAKE OUT VERSION
With the Take out Version
function, you can select a particular version of a document from the
version history and remove it from version control. All other versions of the
document will be deleted.
DELETE
With the Delete
function, you can select a certain version of a document from the version
history and delete that single version. You can also choose to delete all
versions older than the selected one from the server.
CREATE SHORTCUT
With the Create Shortcut
function you can create a shortcut (link) to a particular version of a
document. You can select the version from the version history and create a link
to this version.
VERSION HISTORY
With the Version History
function, you can view the complete version history of a document, including
the version number, the user who created the version and the time it was
created. For each entry in the list the title of the version with a link to
that version is shown, so you can easily view any version in the history.
CHECKED OUT DOCUMENTS
With the Checked out Documents
function you can carry out a search to see which documents are currently
checked out, and by which users. You can limit your search to certain
collections and/or certain users, or search all users on the entire server.
CHECKING IN MULTIPLE DOCUMENTS
The following steps explain how to check in several documents simultaneously.
- Log in to the server by clicking on Login.
- Click on Authoring to switch to authoring mode.
- Navigate to the collection that contains the document(s) you want to check
in. Use the checkboxes to select the document(s).
- Select Modify->Version Control->Check In.
CHECKING IN
SINGLE DOCUMENTS
The following steps explain how to check in a single document. Checking in a
single document has the advantage that you are given the option of manually
changing the version number and you can add a comment about the version.
- Log in to the server by clicking on Login.
- Click on Authoring to switch to authoring mode.
- Navigate to the document you want to check in and select
Modify->Version Control->Check In. A dialog box appears where you
can change the document version number (the New version text box) and
enter a comment about the changes in the version (see Figure 55). Note that the
version number you enter must be greater than the most recent version number.
- Select the Check in only if content changed checkbox, if you only
want a new version to be created and the version number increased when actual
changes have been made to the content of the document.
- Select the Automatically commit version to commit the version you are
checking in.
If you do not select this button, the version you are checking
in will not be the committed version. The committed version will be either the
last document for which this checkbox was selected at checkin, or whatever
version was manually set as "committed". The committed version is the version
that users with read access can view and users with write access can edit.
- Click on the OK button.
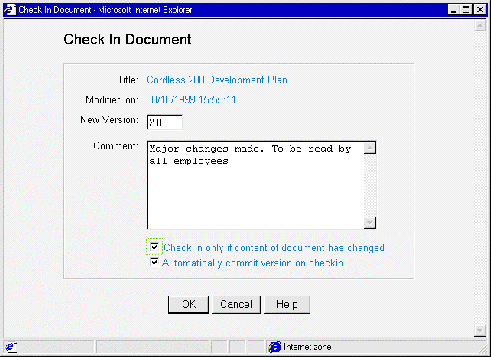 Figure 55: Checking in a document
CHECKING OUT MULTIPLE DOCUMENTS
Figure 55: Checking in a document
CHECKING OUT MULTIPLE DOCUMENTS
The following steps explain how to check out several documents simultaneously.
- Log in to the server by clicking on Login.
- Click on Authoring to switch to authoring mode.
- Navigate to the collection that contains the document(s) you want to check
out. Use the checkboxes to select the document(s).
- Select Modify ->Version Control->Check Out.
CHECKING
OUT SINGLE DOCUMENTS
The following steps explain how to check out a single document.
- Log in to the server by clicking on Login.
- Click on Authoring to switch to authoring mode.
- Navigate to the document you want to check out (or select it by clicking
on its checkbox) and select Modify->Version Control->Check Out.
If you have selected the checkbox in Preferences (Site menu)
labeled Always check out last version, the document will be checked
out.
If you have not selected this checkbox, a dialog box (Figure 56) will appear
allowing you choose which version you would like to check out.
- Use the option buttons to select the version you wish to check out.
- Click on the OK button.
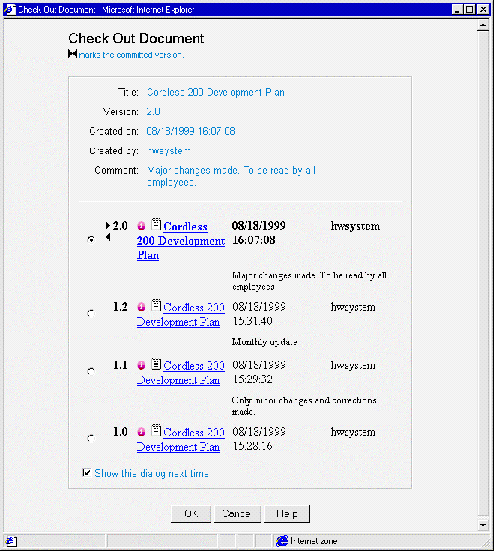 Figure 56: Check Out Document dialog box
Note: It is only possible to check out a version other than
the last version when you check out a single document. If you select
more than one document for check out, the last version of each document will be
checked out, regardless of how your preferences are set.
Figure 56: Check Out Document dialog box
Note: It is only possible to check out a version other than
the last version when you check out a single document. If you select
more than one document for check out, the last version of each document will be
checked out, regardless of how your preferences are set.
SET COMMITTED VERSION
You can commit a version other than the most recent version as follows:
- Log in to the server by clicking on Login.
- Click on Authoring to switch to authoring mode.
- Navigate to the document for which you would like to commit an earlier
version, or select it by clicking on its checkbox.
- Select Modify->Version Control->Set Committed Version.
In the dialog box that appears (Figure 57) use the option buttons to select the
version you would like to commit, and click on the OK button. This version will
now be set as the last committed version, and will appear in the collection
listing. Versions more recent that the committed version will not be deleted
and can be checked out and worked on as normal.
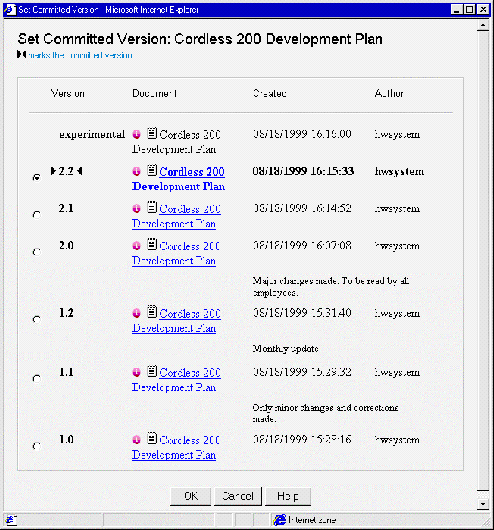 Figure 57: Set Committed Version dialog box
Note: In all dialog boxes where all the versions of a document
are listed, the committed version will be marked by small black arrows either
side of its version number (
Figure 57: Set Committed Version dialog box
Note: In all dialog boxes where all the versions of a document
are listed, the committed version will be marked by small black arrows either
side of its version number (
 )
)
REVERTING TO AN EARLIER VERSION
You can revert to an earlier version of a document as follows:
- Log in to the server by clicking on Login.
- Click on Authoring to switch to authoring mode.
- Navigate to the document for which you would like to revert to an earlier
version, or select it by clicking on its checkbox.
- Select Modify->Version Control->Revert to Version. In the
dialog box that appears (Figure 58), use the option buttons to select the
version you would like to revert to and click on the OK button. All
versions that are later than the version you selected will be permanently
deleted.
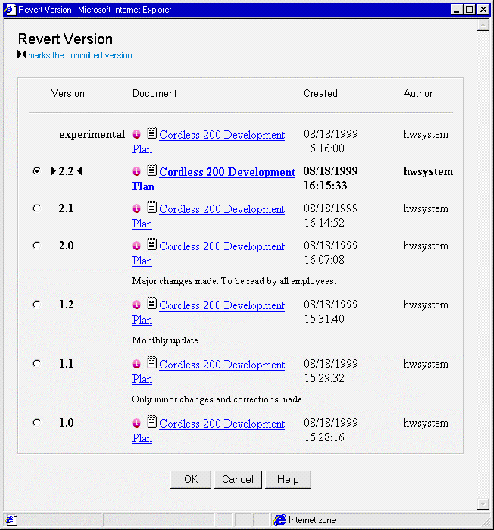 Figure 58: Revert Version dialog box.
TAKING A VERSION OUT OF VERSION CONTROL
Figure 58: Revert Version dialog box.
TAKING A VERSION OUT OF VERSION CONTROL
The following steps explain how to take a version out of Version Control.
- Log in to the server by clicking on Login.
- Click on Authoring to switch to authoring mode.
- Navigate to the document whose version you want to take out of Version
Control (or select it by clicking on its checkbox) and select
Modify->Version Control->Take Out. A dialog box appears (Figure
59), listing all the versions of the document, including their creation date
and author.
- Select the version you wish to take out of Version Control by clicking on
the option button next to the version number.
- Click on the OK button.
Note: This version
will now reside on the server as a normal document, not under version control.
All other versions of this document will be deleted from the server. It is not
possible to execute this command with experimental versions.
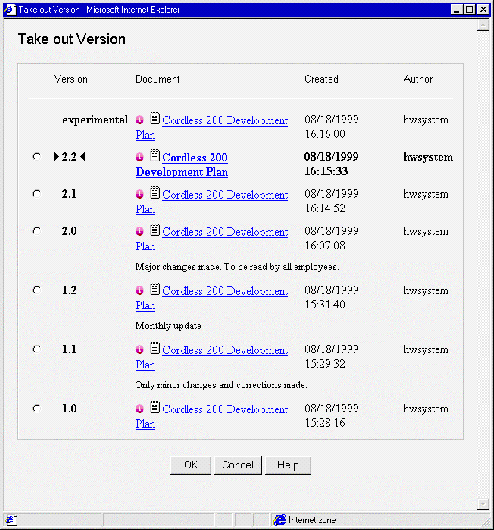 Figure 59: Take Out Version dialog box
DELETING A PARTICULAR VERSION OF A DOCUMENT
Figure 59: Take Out Version dialog box
DELETING A PARTICULAR VERSION OF A DOCUMENT
The following steps explain how to delete a particular version of a document.
- Log in to the server by clicking on Login.
- Click on Authoring to switch to authoring mode.
- Navigate to the document whose version you want to delete (or select it by
clicking on its checkbox) and select Modify->Version
Control->Delete... A dialog box appears, listing all the versions of the
document, including their creation date and author (Figure 60).
- Select the version you wish to delete by clicking on the option button
next to the version number.
- Click on the OK button.
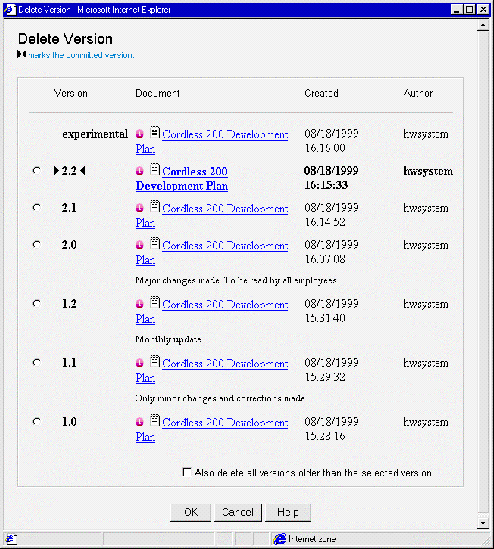 Figure 60: Delete Version dialog box
DELETING ALL OLDER VERSIONS OF A DOCUMENT
Figure 60: Delete Version dialog box
DELETING ALL OLDER VERSIONS OF A DOCUMENT
To delete all older versions of a document, complete the steps as listed above
and make sure that you select the checkbox labeled Also delete all versions
older than the selected version.
If you select this checkbox, and select the option button next to say, V1.2,
this version and all earlier versions (in this case, version 1.1 and 1.0) will
be deleted.
CREATE VERSION SHORTCUT
The following steps explain how to create a version shortcut.
- Log in to the server by clicking on Login.
- Click on Authoring to switch to authoring mode.
- Navigate to the document for whose version you want to create a shortcut
(or select it by clicking on its checkbox) and select Modify -> Version
Control -> Create Shortcut. A dialog box appears (Figure 61), listing
all the versions of the document, including their creation date and author.
Select the version you want to create the shortcut to by clicking on the
appropriate option button.
- Click on the OK button.
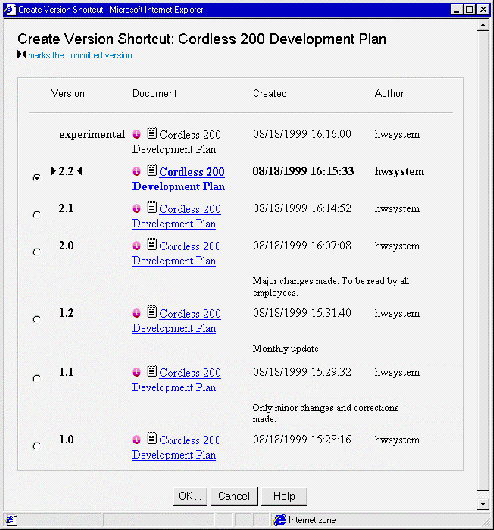 Figure 61: Create a Version Shortcut: Selecting a
Version
Figure 61: Create a Version Shortcut: Selecting a
Version
- Another dialog box appears (Figure 62) where you can specify which
collection you want the Version Shortcut to appear in. Enter the name of this
collection in the text box Destination, or use the file browser.
- Click on the OK button.
 Figure 62: Create a Version Shortcut: Selecting Destination
Collection
VERSION HISTORY
Figure 62: Create a Version Shortcut: Selecting Destination
Collection
VERSION HISTORY
- Log in to the server by clicking on Login.
- Click on Authoring to switch to authoring mode.
- Navigate to the document whose version history information you want to
view (or select it by clicking on its checkbox).
- Select Modify->Version Control->Version History. The version
history appears (see Figure 63). For each version, the version number, time the
version was created, version author, and a link to the version
appear.
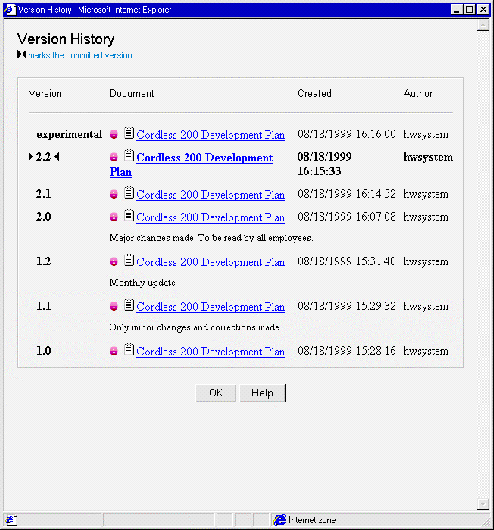 Figure 63: Version History dialog box
DISPLAYING CHECKED OUT DOCUMENTS
Figure 63: Version History dialog box
DISPLAYING CHECKED OUT DOCUMENTS
- Log in to the server and switch to authoring mode by clicking on the
Authoring button.
- Select Modify -> Version Control -> Checked Out Documents
- In the dialog box that appears (Figure 64), select your criteria for
listing checked out documents. Selecting the all users checkbox will display
documents checked out by any user. Alternatively, you can use the User Wizard
to select specific users.
- Use the Scope listbox to search the whole server for checked out
documents, or to search only particular collections.
- When you have set your search criteria, click on the OK button.
- A second dialog box appears, displaying all documents that are checked
out, according to your search criteria. See Figure 65. Documents are displayed
with the time and date they were checked out, and the user who checked them
out. Each entry is displayed as an active link to the document.
- Click on the OK button to exit the dialog box.
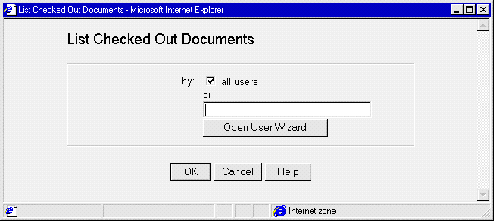 Figure 64: List Checked Out Documents: settings
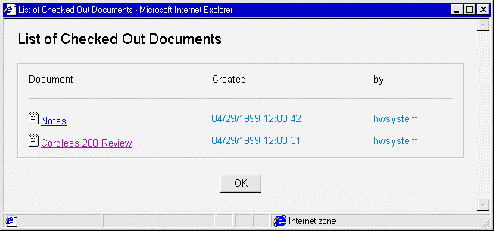 Figure 65: List of Checked Out Documents: results
BROWSING VERSION CONTROLLED DOCUMENTS
Figure 65: List of Checked Out Documents: results
BROWSING VERSION CONTROLLED DOCUMENTS
When browsing a version controlled document, the version you see depends on
whether the document is currently checked in or checked out, what your access
rights
to the document are and whether or not the document has been committed.
As a rule, you will see whatever version of the document is committed, as long
as you have read access to that document.
AUTOMATICALLY COMMITTED AT CHECKIN
If every version of the document has been automatically committed at checkin
and the document is checked in, you will see the last committed version. If the
document is checked out, you will see the last committed version if you only
have read rights, and the experimental version if you have write rights.
MANUALLY SET AS "COMMITTED"
If some version of the document has been set as "committed" and the author has
continued working on (and checking in and out) the more recent versions, you
will always see the committed version, as long as you have read access to the
document.
If you look at the attributes of a version controlled document, the value of
HW_Version (see below) is the version number if the document is checked in or
if you have only read rights. If you have write rights to the object, its value
is "experimental," to show that a user has locked the object.
Note: It is possible to browse the version history and view
versions of documents on remote servers in a server pool.
VERSION CONTROL AND ACCESS RIGHTS
When you check in a new version of a document, by default it gets the same
access rights as the previous version. It is, however, possible to edit the
attributes of each version to give each one different access rights. If the
document is accessed e.g. by a link, the rights attribute of the newest version
is used to determine if the document is displayed or not.
SPECIAL ATTRIBUTES OF VERSION CONTROLLED DOCUMENTS
Version controlled documents have four specialized attributes:
The
value of this attribute is the Hyperwave Information Server user name of the
user who checked in the current version. This attribute is maintained by the
system and cannot be edited.
The
value of this attribute is the point at which the current version was checked
in. It is also maintained by the system and cannot be edited.
This
attribute tells you the version number of the document. This number consists of
a major version number and a minor version number separated by a point. When
checking in a document, you have the choice of taking the default version
number or specifying one yourself. By default, the minor version number is
raised by one, e.g., if you checked out version 2.3, the new version will be
2.4 unless you specify otherwise.
The
value of this attribute is a comment that the person checking in the document
can optionally give to the document.
The
Configurations function allows you to manage collections and hierarchies in a
very effective way. With Configurations
, you can save any collection in its current hierarchical form. In other words,
all objects will be saved, as well as the meta-information on objects, and
structural information regarding how the collection is configured. The
Configurations feature is similar to Version Control in that it stores previous
versions (in this case collection hierarchies, rather than single objects),
allows you to replace the current configuration with an older configuration,
allows you to load previous configurations to the server without overwriting
new content, and allows you to browse previous configurations.
The Configurations menu has five functions, Save, Restore,
Merge, History and Delete.
SAVING A CONFIGURATION
The Save
function allows you to save a collection as a configuration. The selected
collection and its contents are saved to a configuration file. This collection
is now given a special attribute HW_ArchiveType with the value "Configuration".
The configuration file is assigned a major and minor version number. You can
also enter a comment on the configuration to be saved.
Only the most recent version of a configuration is stored in the Hyperwave
Information Server database. All previous versions are saved in separate
configuration files.
Only the most recent version of a configuration can be modified. All previous
configurations are stored in static files outside the database.
Configurations are saved as follows:
- Log in to the server by clicking on Login.
- Click on Authoring to switch to authoring mode.
- Select the collection you wish to save as a configuration by clicking in
its checkbox
- Select Modify->Configurations-> Save
- Check that the information that appears in the dialog box is correct
(modify the version number, if required). If you wish, enter a comment.
- Click on the OK button.
 Figure 66: Save Configuration dialog box
IDENTIFYING CONFIGURATIONS
Figure 66: Save Configuration dialog box
IDENTIFYING CONFIGURATIONS
Collections that are configurations appear on the Hyperwave Information Server
interface with a special icon. This icon looks like the standard
Attributes icon, with a small C in the top right hand corner
 .
.
RESTORING A CONFIGURATION
The
Restore
function allows you to restore a previous configuration to the Hyperwave
Information Server database. This function assigns the restored configuration
as the most recent version, and the configuration that had until now been the
most recent version is deleted. You can identify which configuration in the
history you wish to restore by its major and minor version numbers.
Only when a previous configuration is restored to the database can it be
modified, as it is no longer stored in a static file.
Configurations are restored as follows:
- Log in to the server by clicking on Login.
- Click on Authoring to switch to authoring mode.
- Select the checkbox of the object for which you wish to restore a previous
configuration.
- Select Modify->Configurations-> Restore.
- Using the option buttons, select the configuration you wish to restore to
the Hyperwave Information Server
- Click on the OK button.
 Figure 67: Restore Configuration dialog box
MERGING A CONFIGURATION
Figure 67: Restore Configuration dialog box
MERGING A CONFIGURATION
The Merge
function allows you to restore a previous configuration to the Hyperwave
Information Server without overwriting the most recent version.
In this way, it differentiates itself from the Restore function. The
previous configuration is loaded to the Hyperwave Information Server database,
incorporating any changes that have been made since it was last saved and
assigning it as the most recent version. Again, the configuration to be loaded
is identified by its major and minor version number.
To merge a configuration:
- Log in to the server by clicking on Login.
- Click on Authoring to switch to authoring mode.
- Select the checkbox of the object for which you wish to merge a previous
configuration.
- Select Modify->Configurations-> Merge
- Using the option buttons, select the configuration you wish to merge to
the Hyperwave Information Server
- Click on the OK button.
 Figure 68: Merge Configuration dialog box
CONFIGURATION HISTORY
Figure 68: Merge Configuration dialog box
CONFIGURATION HISTORY
The History
function allows you to show all previous configurations for a configuration
object. Configuration objects are shown in the history with their major and
minor version numbers, the date they were saved and the user who saved them.
All previous configurations can be transparently browsed using your web
browser. There is no need for any extra tools.
BROWSING PREVIOUS C
ONFIGURATIONS
To browse previous configuration:
- Log in to the server by clicking on Login.
- Click on Authoring to switch to authoring mode.
- Select the checkbox of the object whose configuration history you wish to
view.
- Select Modify->Configurations-> History.
- A complete list of previously stored configurations will be displayed with
their major and minor version numbers, the date they were saved and the user
who saved them. You may select any previous configuration for
viewing.
 Figure 69: Configuration History dialog box
All objects belonging to archived configurations can be identified by the
attribute HW_Configuration. The value of this attribute is the GOid of the root
collection of this configuration.
Figure 69: Configuration History dialog box
All objects belonging to archived configurations can be identified by the
attribute HW_Configuration. The value of this attribute is the GOid of the root
collection of this configuration.
DELETING A CONFIGURATION
The Delete function allows you to delete archived configurations from the
configuration history. It is not possible to delete the current configuration,
as it exists on the server and is not stored as an archived file.
To delete a configuration:
- Log in to the server by clicking on Login.
- Click on Authoring to switch to authoring mode.
- Select the checkbox of the object for which you want to delete a previous
configuration.
- Select Modify->Configurations-> Delete.
- Using the option buttons, select the configuration you wish to delete.
- Click on the OK button.
 Figure 70: Delete Configuration dialog box
Hyperwave
Information Server allows users to lock their documents, i.e. it is possible
for a user to designate that only he or she can edit a particular document
during a certain time period.
Figure 70: Delete Configuration dialog box
Hyperwave
Information Server allows users to lock their documents, i.e. it is possible
for a user to designate that only he or she can edit a particular document
during a certain time period.
WHO CAN LOCK A GIVEN DOCUMENT?
Documents can only be locked by their authors, other users who have write
rights for the document and users in the group system.
When a document is locked, it can only be edited by the person who locked it.
Before other users can edit the document, the person who locked it or a member
of the group system must unlock it.
Note: The Lock function can only be used with documents, e.g.
text, images, etc. and not with other objects such as collections. Objects
that are version controlled can not be locked.
 Figure 71: A document that has been locked
HOW TO LOCK DOCUMENTS
Figure 71: A document that has been locked
HOW TO LOCK DOCUMENTS
- Log in to the server by clicking on Login.
- Click on Authoring to switch to authoring mode.
- Navigate to the document you want to lock.
- Select Modify->Lock Object.
APPEARANCE OF LOCKED
DOCUMENTS
Once a document is locked, all users who view it in edit mode see a status line
that says that the document is locked and which includes the name of the user
who locked it (see Figure 71).
HOW TO UNLOCK DOCUMENTS
- Log in to the server by clicking on Login.
- Click on Authoring to switch to authoring mode.
- Navigate to the document you want to unlock.
- Select Modify->Unlock Object.
|
|
Benutzer: Gast •
Besitzer: hwsystem • Zuletzt geändert am:
|
|
|