


2.3.4 The Publish Menu
This menu lets you access all functions for inserting new objects into the
server, e.g. collections, clusters, files, annotations, remote documents, etc.
You can use these functions as long as you have appropriate access rights for
the collections you want to insert objects into.
The Publish menu contains the following items:
- File: Files of any type can be uploaded.
- Collection: A collection is a container used for holding other
collections and documents.
- Cluster: Clusters allow you to combine multiple documents as
desired.
- Sequence: This collection type automatically links the items
contained in it sequentially.
- Forum: This item allows you to insert a discussion forum.
- HTML: You can type in and upload an HTML text (to upload an HTML
file, use the item File). If you are using Microsoft Internet Explorer
4.x as your browser, you can use the integrated Hyperwave HTML editor to create
HTML documents.
- Text: You can type in and upload a plain text (to upload a text
file, use the item File).
- Note: Formerly called Annotation, this item allows you to attach
comments to an object on the server.
- Remote Document: A Remote Document is a link to a document on
another server.
- CGI: This item allows you to create CGI objects.
The methods
for inserting the above document types are explained in greater detail below.
DOCUMENT CLASSES: CHANGES TO THE PUBLISH MENU
The Publish menu will also include any document classes types that have
been declared for the particular server. These will appear at the end of the
menu. Changes to the Publish menu are explained in more detail on
page
116.
Files
are inserted as follows:
- Log in to the server by clicking on Login.
- Click on Authoring to switch to authoring mode.
- Navigate to the collection you want to insert the file into.
- Select Publish->File. The Upload File dialog box appears
(see Figure 24). Keep in mind that you must have the appropriate access to the
collection where you want to insert the file.
- Enter a Title for the document and select a language from the menu.
If you leave the Title text box blank and the file you are uploading is of type
HTML, the title is parsed from the HTML file. For all other file types, the
title is created from the file name without the extension. Note that if there
is a space in the file name, it is converted to an underline (_ ) character in
the title.
- Enter a Description if desired.
- A Name (unique identifier for the object being inserted) is
optional. If your browser supports JavaScript and you did not enter a name, a
name will automatically appear in the Name text box after you press the
Insert file button. This name consists of the name of the parent
collection and the file name, separated by a slash (HTML file names appear
without the file extension). Thus, if the file hyperwave.gif is
inserted into a collection with the name "graphics", the suggested name is
"graphics/hyperwave.gif".
- Click on the More button to enter additional attributes. The
MimeType and Base attributes are explained below; all other attribute types are
explained on
page
116. The Custom Attribute text box allows you to enter an attribute with the
name and value of your choice.
- Enter the full path for the file you want to insert, or use the Browse
button to select a file.
- Click on the OK button.
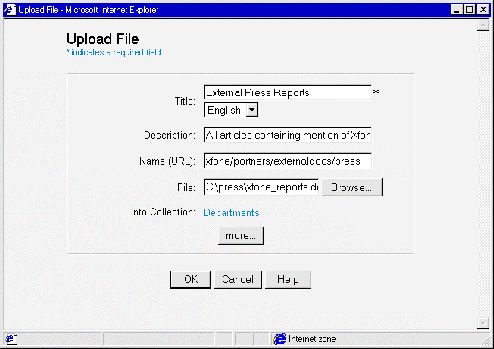 Figure 24: Uploading a file
THE BASE ATTRIBUTE
The Base attribute
is necessary for texts and is by default the name of the server you are
currently connected to, e.g. http://www.hyperwave.com. The value of
Base is used as base for the links in the HTML text, i.e. a link that looks
like this
<A HREF="telephone_list.html">Telephone numbers</A>
in your HTML text will, with the above mentioned base attribute, point to
http://www.hyperwave.com/telephone_list.html.
MIMETYPE
MimeType
is used to tell Hyperwave Information Server the type of file being uploaded.
It is entered by selecting a MIME type from those available in the listbox. In
many cases it is possible to take the default "automatic detection" option
because the server uses a so-called magic number test to figure out the file
type, and, if you use Netscape, many further file types are recognized by their
extensions. The following MIME types are recognized by Hyperwave Information
Server:
| MIME
type
|
File
type
|
| text/html
|
HTML
text
|
| application/postscript
|
PostScript
files
|
| image/jpeg
|
JPEG
images
|
| image/gif
|
GIF
images
|
| image/x-png
|
PNG
images
|
| video/mpeg
|
MPEG
videos
|
| video/x-avi
|
AVI
videos
|
| x-world/x-vrml
|
VRML
3D scenes
|
| audio/x-wav
|
WAV
audio
|
| audio/x-au
|
AU
audio
|
| application/x-java
|
Java
classes
|
INSERTING
COLLECTIONS
Collections
are inserted as follows:
- Log in to the server by clicking on Login.
- Click on Authoring to switch to authoring mode.
- Navigate to the collection you want to insert the collection into.
- Select Publish->Collection. The New Collection dialog box
appears (see Figure 25). Keep in mind that you must have the appropriate access
to the collection where you want to insert the collection.
- Enter a Title for the new collection including a language from the
listbox.
- Enter a Description for the collection if desired.
- Enter a Name for the collection. Names should be given
hierarchically, e.g. if you are inserting the collection into the collection
"smith", and it is a collection for papers, you should call the new collection
"smith/papers".
- By clicking on the More button, you can add further attributes,
including a Custom Attribute with the type and value of your choice. An
explanation of available attribute types and their values is found on
page
116.
- Click on the OK button.
INSERTING CLUSTERS
The procedure for inserting clusters is the same as that for inserting
collections except that you must select Publish->Cluster and the
cluster type of your choice in step 3. See
page
116 for a description of collection types.
INSERTING SEQUENCES
The procedure for inserting sequences is the same as that for inserting
collections except that you must select Publish->Sequence in step 3.
See
page
116 for a description of collection types.
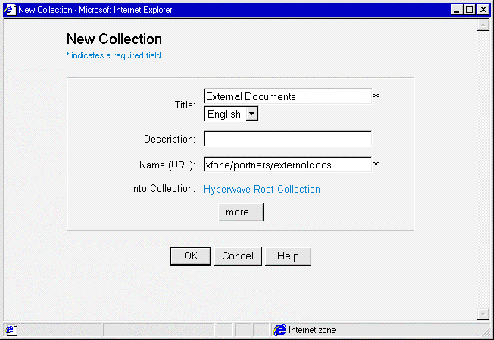 Figure 25: Inserting a collection
See
page
122 for an explanation of how discussion forums and newsgroups are created.
HTML
and plain text can be inserted into Hyperwave Information Server not only in
the form of files; they can also be entered by hand just before being uploaded.
Inserting HTML has been made even easier by means of an integrated HTML editor
(for Internet Explorer).
INSERTING PLAIN TEXT
To insert plain text into Hyperwave Information Server:
- Log in to the server by clicking on Login.
- Click on Authoring to switch to authoring mode.
- Navigate to the collection you want to insert the text into.
- Select Publish->Text. The New Text dialog box appears.
Keep in mind that you must have the appropriate access to the collection where
you want to insert the text.
- Enter a Title for the new text including a language from the
listbox.
- Enter a Description for the text if desired.
- Enter the text in the large text box in the dialog box (see Figure 26).
The text should be plain ASCII text.
- Click on the More button to enter additional attributes. All
attribute types are explained on
page
116. The Custom Attribute text box allows you to enter an attribute with the
name and value of your choice.
- Click on the OK button.
 Figure 26: Inserting plain text
INSERTING HTML
To insert an HTML document:
- Log in to the server by clicking on Login.
- Click on Authoring to switch to authoring mode.
- Navigate to the collection you want to insert the text into.
- Select Publish->HTML. The integrated HTML editor appears (see
Figure 27). Keep in mind that you must have the appropriate access to the
collection where you want to insert the HTML text.
- Choose a template from the listbox at the top left of the window. You can
specify a templates collection under
config\htmleditor.js\htmleditor.templatesCol in the PLACE template
files. All templates in this collection will then be available in this listbox.
You can also work without templates.
- For more information on PLACE templates and the files that are used
for configuring the interface, please consult the Hyperwave Programmer's Guide.
- Enter the text you wish to publish in the large text box. There is no need
to attach HTML tags, as this will be done automatically by the editor. Format
the text in whatever way you want. A more detailed description of the toolbar
options is included below.
- Upload the HTML text to the server, by clicking on the Post to Server
button (
 ).
You will be prompted with two dialog boxes and must enter first a Title
and then a Name (URL) for the text. See Figure 28 and Figure 29.
- Click on the OK button.
Note: The Hyperwave
HTML Editor only works on Microsoft Internet Explorer 4.x. If you are working
with Netscape Navigator, or an earlier version of the Internet Explorer, HTML
text is inserted via the New Text dialog box (with HTML tags).
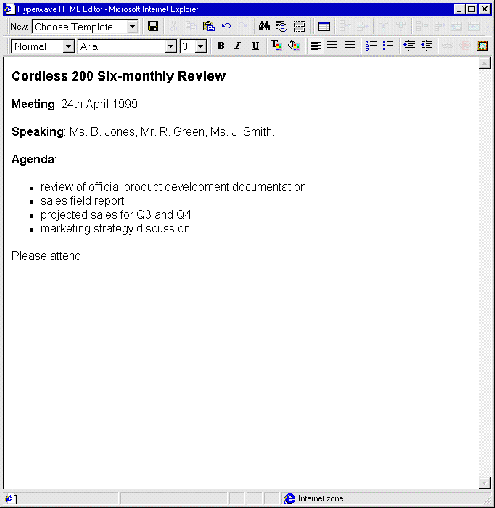 Figure 27: The Hyperwave HTML Editor
HYPERWAVE HTML EDITOR FEATURES
Editing features of the Hyperwave HTML Editor include:
Text formatting: You can set character formatting, including font style,
face, size, and color. Paragraphs can be justified and indented.
Editing: Multi-level Undo and Redo commands are supported.
You can also use standard Cut, Copy, and Paste commands.
Elements can be moved or resized by dragging. Standard Windows keyboard
shortcuts are supported.
Drag-and-drop capability: You can drag any object, text, or element
anywhere on the page.
Search: There is a Find dialog box that you can use to search for
text.
Hyperlinking: You can define links and bookmarks in the text.
Images: You can insert images into the document.
Table support: You can insert tables and can add and delete columns,
rows, and cells
These editing features are supported by standard Windows toolbar buttons.
HTML EDITOR TOOLBAR OPTIONS
Most of the toolbar icons in the Hyperwave HTML Editor are the same as icons
used on standard Windows applications. There are, however, several buttons that
may need to be explained.
 This button is labeled Post to Server, although it retains its standard
Windows function of Save. When you click on this button, you will be
prompted to enter a Title and then a Name for the HTML document.
See Figure 28 and Figure 29.
 Figure 28: Enter a Title for the HTML Document
 Figure 29: Enter a Name (URL) for the HTML Document
 This button is labeled Internal Link and is used to create links within the
Hyperwave Information Server.
INSERTING INTERNAL LINKS
- Mark the word(s) you want to create a link from with your mouse and click
on the Internal Link button.
- In the dialog box that appears you can either type the link URL in the
text box, or browse Hyperwave Information Server collections to find the
collection you want to create a link to (see Figure 30).
- Click on the OK button.
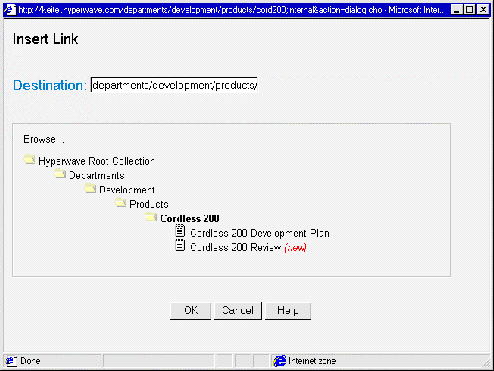 Figure 30: Inserting an Internal Link
 This button is labeled External Link and is used to create links to documents
outside of the Hyperwave Information Server.
INSERTING EXTERNAL LINKS
- Mark the word(s) you want to create a link from with your mouse, and click
on the External Link button.
- In the dialog box that appears (see Figure 31), choose the protocol of the
link (http, ftp etc.) and type a URL for the document.
- Click on the OK button.
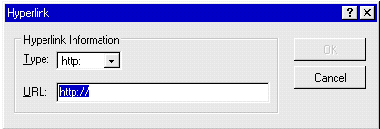 Figure 31: Inserting an External Link
 This button is labeled Show Details. This allows you to display certain
non-visual elements of the HTML documents (for example, inserted Scripts, HTML
comments, etc.), which can avoid these elements being inadvertently deleted.
 This button is labeled Visible Borders. It shows borders around a table,
even if the table has invisible borders (to create a border with invisible
tables, set border = 0 in the HTML tags).
 This button is labeled Insert Image and is used to insert images into
HTML documents. You can insert any images that are stored on the server, when
creating or modifying HTML documents using the Hyperwave HTML Editor.
INSERTING IMAGES
- In the Hyperwave HTML Editor, place your cursor at the point in the HTML
document where you want the image to appear.
- Click on the Insert Image icon on the far right of the toolbar.
- A dialog box appears (see Figure 32) where you can either enter the path
of the picture file into a text box, or navigate to its position on the server.
- Click on the OK button. The image will appear in the HTML
text.
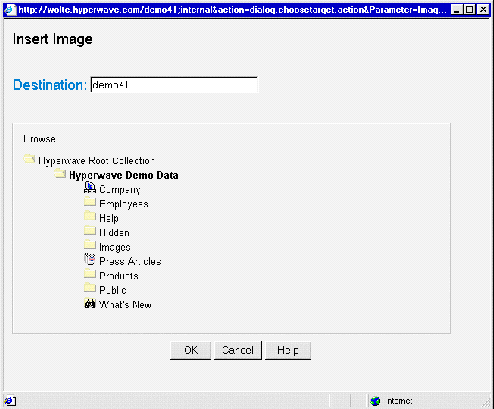 Figure 32: Inserting an Image in the Hyperwave HTML
Editor
The listbox at the left of the HTML Editor window shows Normal by
default. In this listbox is a list of predefined formatting styles that can be
applied to text (e.g. Heading 1).
The other two listboxes allow you to set font type and font size.
HTML documents created using the Hyperwave HTML Editor will be uploaded to the
specified collection as normal.
It
is possible to attach a note to any object in Hyperwave Information Server. By
default, annotated objects display a link to their annotations in their footer.
- Log in to the server by clicking on Login.
- Click on Authoring to switch to authoring mode.
- Select Publish->Note. The New Note dialog box appears.
- Back in the main browser window, navigate to the collection or document
you want to annotate, or select it by clicking in the checkbox to the left of
the title. If you want to annotate the entire document, click on the Whole
Document button back in the New Note dialog box. If you want to
annotate a specific word or phrase in the document, mark that phrase and click
on the Current Selection button.
- Enter the text of the annotation in the large text box. This text can be
plain text but HTML markup is allowed. However, the HTML header and footer are
automatically added to the text so what you enter in the form should only
contain elements that are allowed in the <BODY> section of an
HTML text. Note that if you enter plain text, carriage returns will be ignored
unless you enter a <P> or <BR> tag. After the
annotation is inserted, a link from the annotation to the annotated object is
automatically made.
- Give the note a title and select a language from the list. Default is the
title of the object you are annotating, preceded by the text "Comment on".
- Enter the Name attri
bute
of the collection you want to insert the annotation into. Default is the
collection you were browsing when you opened the New Note dialog box.
- Enter a Name attribute for the note. Optionally enter a description.
- Select the access rights for the annotation. Public annotation
makes the annotation readable by all users, Private annotation makes it
readable by its author only, and Inherit Access Rights causes the
annotation to have the same access rights as the collection it is being
inserted into.
- Click on the OK button.
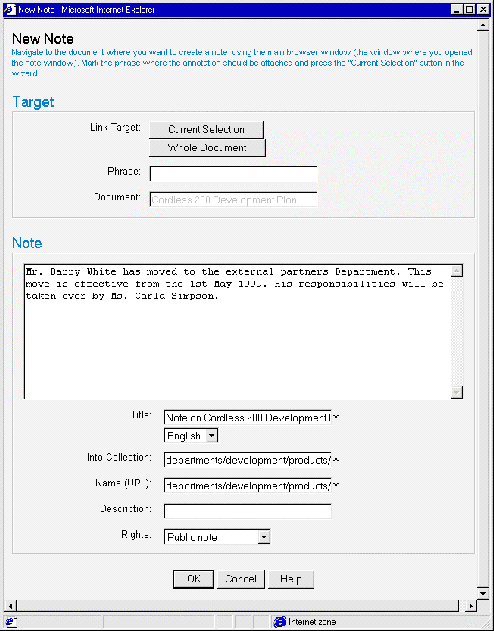 Figure 33: The New Note dialog box
VIEWING NOTES BY BUTTON
Notes will appear as normal documents in the same collection listing as the
document for which you inserted the note. As well as this, when you navigate to
the document for which you inserted the note, the HWIS footer will appear at
the end of the document like this:

By clicking on the red Show button at the right of the footer, you will
display the note that was attached to the document.
VIEWING NOTES BY MENU
It is also possible to view the notes attached to a document without displaying
the document itself. This is especially useful for document types that cannot
be opened in the browser.
To view the notes attached to a document:
- Log in to the server by clicking on Login.
- Click on Authoring to switch to authoring mode.
- Select the checkbox next to the document for which you wish to view the
existing notes.
- Select ViewàNotes. A dialog box appears listing all the
notes available for this document.
- Double click on the note you wish to view. This will be displayed in the
browser window, and the Notes dialog box will remain open to allow you
to choose subsequent notes for viewing.
- Click on the OK button to close the Notes dialog box, and
return to the collection listing by clicking on the Up One Level button, or on
the Back button in your browser.
Hyperwave
Information Server lets you insert remote objects into the server. Remote
objects are references to objects on other servers, e.g. WWW or FTP servers.
- Log in to the server by clicking on Login.
- Click on Authoring to switch to authoring mode.
- Navigate to the collection you want to insert the remote document into.
Select Publish->Remote Document. The New Remote Document
dialog box appears. Keep in mind that you must have appropriate access to the
collection where you want to insert the remote document.
- Give the remote document a title and select a language from the list.
- Enter the URL of the remote object you want to access with the remote
document. See below for details about what types of URLs can be entered.
- A Name (unique identifier for the object being inserted) and description
for the remote document are optional.
- Click on the More button to enter additional attributes. All
attribute types are explained on
page
116. The Custom Attribute text box allows you to enter an attribute with the
name and value of your choice.
- Click on the OK button.
REMOTE URLS
It is possible to insert documents of types "http", "https", "ftp", and
"telnet". The URL is entered using the protocol type followed by "://", then
the address. Some examples are
http://www.icg.tu-graz.ac.at/magellan
for a WWW document, and
ftp://ftp.iicm.edu
for an FTP connection.
For telnet connections, the URL is entered in the following form:
telnet://user@host
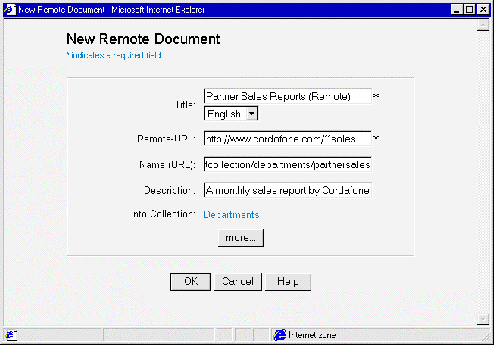 Figure 34: Inserting a remote document
INSERTING CGI OBJECTS
This option is only available for system users
and is explained in the Hyperwave Administrator's Guide.
As
previously mentioned, any document classes that have been declared for the
current object, will appear as "insertables" on the Publish menu. For
information on how to insert these document classes (with reference to the
example AddressBookEntry), see
page
119.


|
|
Benutzer: Gast •
Besitzer: hwsystem • Zuletzt gešndert am:
|
|
|


![]() This button is labeled Post to Server, although it retains its standard
Windows function of Save. When you click on this button, you will be
prompted to enter a Title and then a Name for the HTML document.
See Figure 28 and Figure 29.
This button is labeled Post to Server, although it retains its standard
Windows function of Save. When you click on this button, you will be
prompted to enter a Title and then a Name for the HTML document.
See Figure 28 and Figure 29. 


![]() This button is labeled Visible Borders. It shows borders around a table,
even if the table has invisible borders (to create a border with invisible
tables, set border = 0 in the HTML tags).
This button is labeled Visible Borders. It shows borders around a table,
even if the table has invisible borders (to create a border with invisible
tables, set border = 0 in the HTML tags).![]() This button is labeled Insert Image and is used to insert images into
HTML documents. You can insert any images that are stored on the server, when
creating or modifying HTML documents using the Hyperwave HTML Editor.
This button is labeled Insert Image and is used to insert images into
HTML documents. You can insert any images that are stored on the server, when
creating or modifying HTML documents using the Hyperwave HTML Editor. 


